プロジェクター画面の設置距離とサイズを計算する方法?
プロジェクター画面の設置距離とサイズを計算する方法? That would be the first thing when you have bought a projector. Calculating these figures based on the projector’s parameters is a relatively simple process. In this blog, we will introduce you to the important parameters of projectors and guide you through the steps of installing a projector.
There are many parameters for projectors, but we only need to know the most important ones to calculate the projection area. We will use a specific projector as an example to calculate the projection area.
The main data of this projector are as follows:
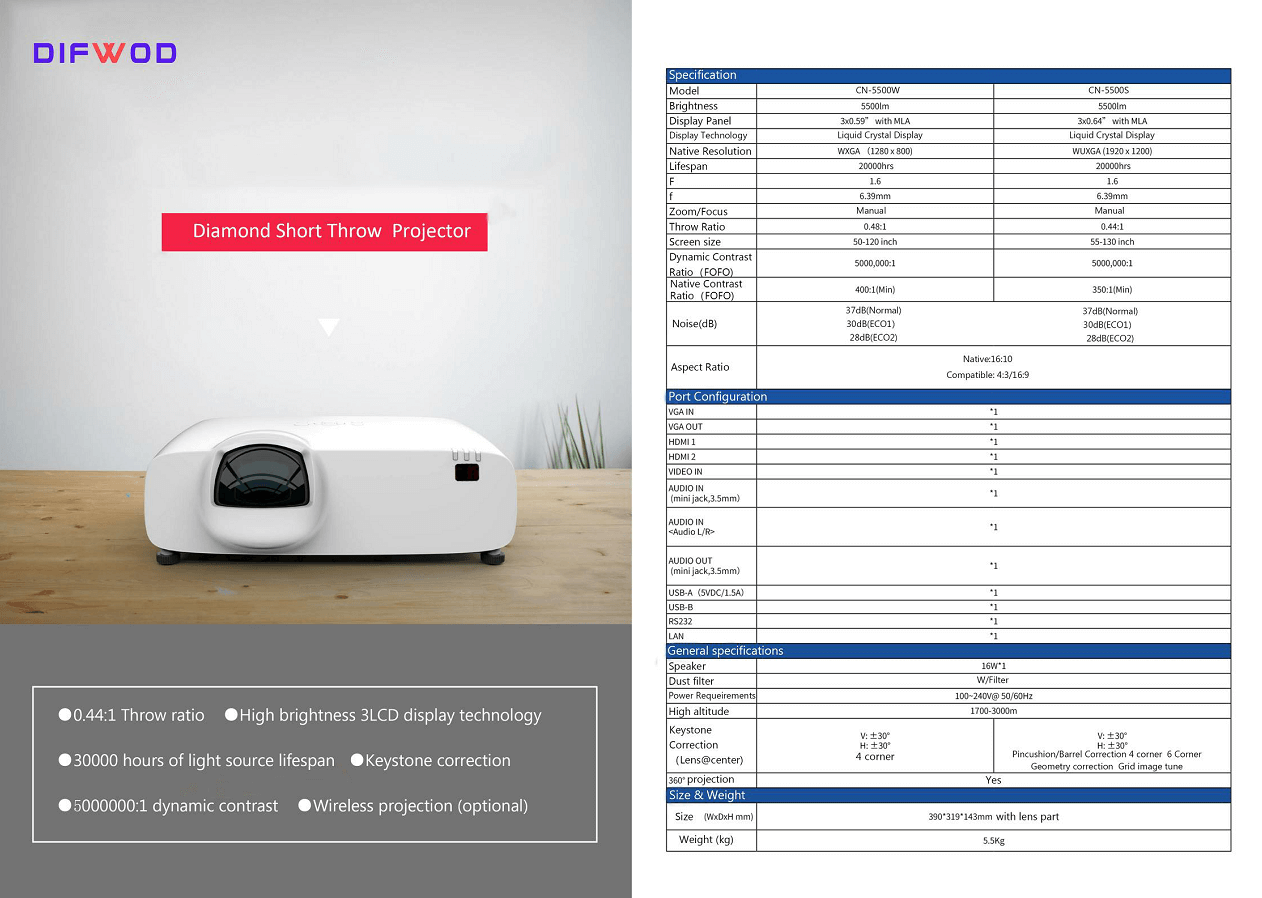
Brightness: 5500 lumens
Projection ratio: 0.44
解決: 1920*1200 XGA
プロジェクター画面の設置距離とサイズを計算する方法? Step 1: Determine the Projection Area
After knowing the main information about the projector, the first step is to determine the desired projection area. Before calculating the installation position of the projector, you need to determine the desired size of the projected image. This will depend on the size of your screen or wall, the distance between your projector and the projection surface, and how close you want your audience to be to the image.
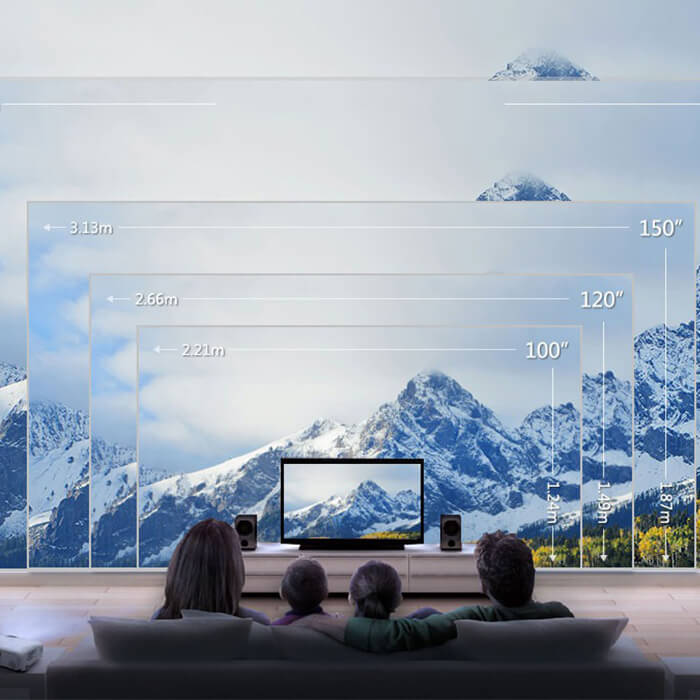
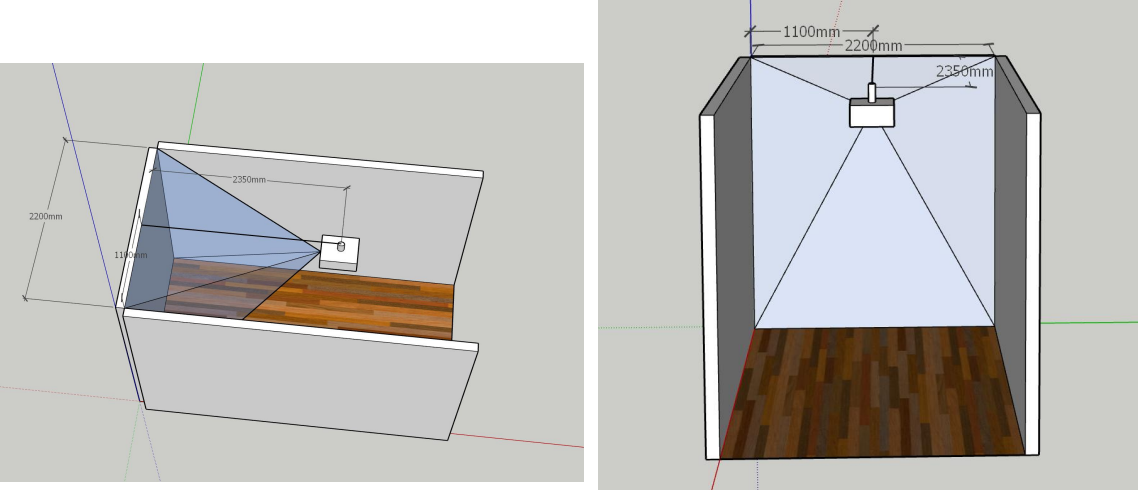
Assuming that we have purchased the above projector, we want to project an image with a length of 5 meters, but the height is not yet determined.
プロジェクター画面の設置距離とサイズを計算する方法? Step 2: Calculate the Installation Distance
The throw distance is the distance from the projector lens to the projection surface, which can be the floor, wall, or screen surface. The projection distance is related to the projector’s projection ratio. According to the projector described above, we can simply calculate the projection distance by the following formula:
Projection distance (meters) = Screen width (meters) x Projection ratio
Therefore, for our desired screen width of 5 meters and a projection ratio of 0.44, the projection distance is 2.2 meters. This means that the distance from the projector lens to the wall/screen should be 2.2 meters, but does not include the installation distance. If you project onto the floor, the projection distance in this calculation represents the distance between the lens and the floor. If the distance between the floor and ceiling is higher than 2.7 meters, and you reserve approximately 0.5 meters for the installation of the projector mount, then this projector can project a 5-meter-long image. If you project onto a wall, it means that the distance between the projector lens and the wall should be 2.2 meters.
プロジェクター画面の設置距離とサイズを計算する方法? Step 3: Calculate the Image Size
Once you have calculated the projection distance, you can determine the screen size by using the projector’s zoom and lens shift features, or by using online calculators based on the projector’s resolution and aspect ratio.
Given our desired screen width of 5 meters and using the projector described above with a resolution of 1920*1200 and a ratio of 16:10, we can calculate the screen height as follows:
Screen height (meters) = Screen width (meters) x (Aspect ratio)
Aspect ratio = 10/16=0.625
Screen height = 5 x 0.625 = 3.125 meters.
プロジェクター画面の設置距離とサイズを計算する方法? Step 4: Determine the Installation Position
To ensure that the image is clear and undistorted, it’s important to mount the projector at the appropriate height. This will depend on the height of your projection surface and the tilt of your projector. As a general rule, the center of the projector lens should be positioned at the same height as the center of the projection surface.
Based on the above calculations, if we want a screen width of 5 meters, we would need to install the projector at a distance of 2.2 meters from the wall/screen, resulting in an image size of 5×3.1 meters. We would install the projector at the midpoint of the 5-meter distance, or 2.5 meters, for optimal viewing.
プロジェクター画面の設置距離とサイズを計算する方法? Step 5: Adjust Keystone Correction
Keystone correction is used to correct the distortion that can occur when a projector is not perfectly aligned with the projection surface. Most projectors have built-in keystone correction features, but these can result in lower image quality. To achieve optimal image quality, it’s best to adjust the position of the projector and projection surface to achieve a perfectly rectangular image.
プロジェクター画面の設置距離とサイズを計算する方法? 結論:
Calculating the installation position for your projector can be a complex task. However, through our blog, I think you already know How to Calculate the Installation Distance and Size of the Projector Screen, and noticed that it’s not as difficult as it seems. When you are buying a projection system with 破滅的, we will normally offer an installation guide and also an installation video so that it can greatly help our clients. Of course, for big projects, we have technicians who will be there to ensure the whole system works well.
Below is an example installation diagram we made for one of the customers
インタラクティブプロジェクションシステムについてもっと知りたい場合, フォローしてください. we will share more useful information on our blog. DIFWOD is a supplier who is offering interactive projection systems from hardware to software. 引用については、クリックしてください 引用, ほとんどの場合、質問はFAQをクリックしてください, あなたが私たちのパートナーであることに興味があるなら, 私たちのパートナーになることを確認してください. どうもありがとうございました。他の人と共有してください.